Showing posts with label Visible Image. Show all posts
Saturday, 25 June 2016
Off with your head
I still love the Alice In Wonderland sets from Visible Image, but the Queen of Hearts has always been my favourite.
I coloured her using Promarkers and a gold pen to highlight the crown and jar lid. I mounted pieces of gold, red and white card with red hearts on to a 6x6 card blank.
I fussy cut both the Queen and the jar, then stuck them to the front of the card.
Finally I stamped the words from the set onto white card, cut them in odd shapes, then mounted them onto red and gold card before sticking them to the top of the finished card.
Saturday, 11 June 2016
Just for Mum
I was desperate to get my hands on this gorgeous dragonfly stamp (Live In The Moment) from Visible Image, so when I won the monthly challenge it was the first thing that went into the basket.
I had a few ideas about how I wanted to use it but this was the first quick card make (yes I know I'm very impatient)
I started with a piece of 5.5" white card, I used the free mini grunge flower stamp from Craft Stamper (also design by Visible Image) to create the perfect background. I used a pale green ink to give a subtle flowery finish. I then used a much darker ink to stamp two dragonflies traveling in opposite directions.
I then cut the cut the card into three equal pieces and mounted them onto a slightly larger piece of green card, I then mounted those onto a 6x6 white card blank. Finally I added a silver gem onto each outer corner and using Thickers stickers I wrote the words 'For You Mum'.
I had a few ideas about how I wanted to use it but this was the first quick card make (yes I know I'm very impatient)
I started with a piece of 5.5" white card, I used the free mini grunge flower stamp from Craft Stamper (also design by Visible Image) to create the perfect background. I used a pale green ink to give a subtle flowery finish. I then used a much darker ink to stamp two dragonflies traveling in opposite directions.
I then cut the cut the card into three equal pieces and mounted them onto a slightly larger piece of green card, I then mounted those onto a 6x6 white card blank. Finally I added a silver gem onto each outer corner and using Thickers stickers I wrote the words 'For You Mum'.
Saturday, 16 April 2016
Little box of secrets
This is an older piece that I had totally forgotten about. Once again I have used an Alice In Wonderland stamp from Visible Image.
The box top is a piece of square Stampbord, I lightly inked the whole thing using various blue Distress inks, then I used a keyhole mask with a darker blue. I stamped Alice onto the dried background, then took the colour back on her tights, apron and skin, I finally added a pale pink onto her skin to give her a bit of colour.
I painted the entire box pale blue and added the Good Times onto the side using another Visible Image stamp and some white WOW embossing powder.
Tuesday, 5 April 2016
Beautiful butterfly
This is a simple but very effective card using the two different size butterfly stamps from Visible Image.
I stamped the two butterflies in Versamark ink directly onto the card blank, which was the most difficult bit because it's really hard to see where you have been. Next I used several colours of Cosmic Shimmer mica powders to create a rainbow effect over the stamped images.
I stampedand embossed the words using WOW embossing powder, then mounted the words onto a small piece of lilac card.
To buy more Visible Image stamps why not visit their website
I stamped the two butterflies in Versamark ink directly onto the card blank, which was the most difficult bit because it's really hard to see where you have been. Next I used several colours of Cosmic Shimmer mica powders to create a rainbow effect over the stamped images.
I stampedand embossed the words using WOW embossing powder, then mounted the words onto a small piece of lilac card.
To buy more Visible Image stamps why not visit their website
Sunday, 3 April 2016
Just the way you are.
So I'm beginning to think I only use one brand of stamps now, yes here's another Visible Image stamp.
First of all the background was done by spritzing a piece of water colour card then sprinkling with different coloured Brushos. I love Brushos because no two pieces ever look the same and you can get some brilliant effects with the.
So this is an easy card with just two stamps, both from Visible Image, stamped straight onto the water colour card and embossed in black WOW powder.
For more Visible Image stamps why not pop over to their website here
First of all the background was done by spritzing a piece of water colour card then sprinkling with different coloured Brushos. I love Brushos because no two pieces ever look the same and you can get some brilliant effects with the.
So this is an easy card with just two stamps, both from Visible Image, stamped straight onto the water colour card and embossed in black WOW powder.
For more Visible Image stamps why not pop over to their website here
Friday, 1 April 2016
The course of true love.
I find making wedding cards a bit of a trauma to be honest, I don't like fussy cards so none of the frills and fluff for me.
So two lovely people were getting married and they just so happen to make some of the best stamps ever. Helen and Mark owners of Visible Image got married last year and for some reason I haven't posted an image of the card I made them, until now.
All of the stamps used are from Visible Image, however some of them have now been retired unfortunately.
I started by stamping the Heart INKognito stamp onto my card blank in Versamark, then I lightly dusted of the images using a pale pink Cosmic Shimmer mica powder.
The two characters were stamped onto white card and coloured using Promarkers, then I used stickles over the cloak to give it some sparkle.
This is Edward who was retired last year.
This is Isabella who was also retired last year.
Although only the Heart INKognito stamp is available now Visible Image still have a fantastic range of stamps in their shop.
So two lovely people were getting married and they just so happen to make some of the best stamps ever. Helen and Mark owners of Visible Image got married last year and for some reason I haven't posted an image of the card I made them, until now.
All of the stamps used are from Visible Image, however some of them have now been retired unfortunately.
I started by stamping the Heart INKognito stamp onto my card blank in Versamark, then I lightly dusted of the images using a pale pink Cosmic Shimmer mica powder.
This is Edward who was retired last year.
This is Isabella who was also retired last year.
The roses, which are part of the Isabella set, have been stamped several times, cut up and layered to create a 3D flower, I then added stickles to the edges.
Finally I added the Love from the Isabella set and Is Forever from the Edward set, thus creating the perfect partnership.
Although only the Heart INKognito stamp is available now Visible Image still have a fantastic range of stamps in their shop.
Labels:
Cosmic Shimmer,
mica powder,
Promarkers,
Visible Image
Monday, 28 March 2016
For you Mum
It was Mother's Day in the UK earlier this month and it just so happened that I received my fantastic prize from Helen and Mark over at Visible Image stamps. This dragonfly was one of four stamps I picked with my voucher.
The set is called Live in the moment and includes the dragonfly and the words in the title.I also used the free Visible Image mini grunge flower stamp from the April issue of Craft Stamper.
Firstly I stamped the two dragonflies onto a piece of 6x6 white card which I cut into three equal pieces.
Next I mounted the three pieces onto a piece of turquoise card and added four silver gems on the corners.
Finally I added the For you Mum words using turquoise thickers.
For more Visible Image stamps and ideas why not visit them here
The set is called Live in the moment and includes the dragonfly and the words in the title.I also used the free Visible Image mini grunge flower stamp from the April issue of Craft Stamper.
Firstly I stamped the two dragonflies onto a piece of 6x6 white card which I cut into three equal pieces.
Next I mounted the three pieces onto a piece of turquoise card and added four silver gems on the corners.
Finally I added the For you Mum words using turquoise thickers.
For more Visible Image stamps and ideas why not visit them here
Saturday, 26 March 2016
Down to earth with the bumps
This is another fab stamp set from Visible Image, once again they have created a small but perfect set of matching stamps (the others are a robot and a space explorer)
This is the Alien Invader, which comes with all of the images used on my card plus a ringed planet and the words You're out of this world.
I stamped my alien and used Promarkers to colour him, I then mounted him on purple card, then silver mirror card.I used the flying saucer stamp from the set straight onto my card blank to create the background.
Finally I stamped the greeting onto white card and mounted this onto purple card.
Why not pop over to Visible Image to see the rest of their amazing stamps.
This is the Alien Invader, which comes with all of the images used on my card plus a ringed planet and the words You're out of this world.
I stamped my alien and used Promarkers to colour him, I then mounted him on purple card, then silver mirror card.I used the flying saucer stamp from the set straight onto my card blank to create the background.
Finally I stamped the greeting onto white card and mounted this onto purple card.
Why not pop over to Visible Image to see the rest of their amazing stamps.
Tuesday, 7 April 2015
Wicked
This is actually my second attempt at the Wicked Witch from Visible Image's Wizard of Oz series, she's brilliant but I really struggled with her skin. The first one I did had really dark green skin but I just didn't like the finished look.So I decided to lighten her skin a little and I was quite pleased with the outcome (although these pictures don't do her justice).
I stamped the witch onto white card and coloured her with Promarkers. I then stamped the fireball onto red card using Versamark and embossed it with orange Wow powder, I then used an embossing pen to colour the inside of the fireball to emboss using yellow Wow powder.
I created the background using several mica sprays and stamped the small flying monkeys onto it using grey Memento ink.
Finally I stamped and embossed the 'Beautifully Wicked' words onto card and mounted it onto black card.
I stamped the witch onto white card and coloured her with Promarkers. I then stamped the fireball onto red card using Versamark and embossed it with orange Wow powder, I then used an embossing pen to colour the inside of the fireball to emboss using yellow Wow powder.
I created the background using several mica sprays and stamped the small flying monkeys onto it using grey Memento ink.
Finally I stamped and embossed the 'Beautifully Wicked' words onto card and mounted it onto black card.
Friday, 3 April 2015
More Molly
This is a card I made for my niece's birthday recently (she turned 14), I wanted something funky but still girlie without being childish. So Molly from Visible Image was the first stamp that sprang to mind, she is a brilliant stamp for a wide age range. Also the accessories are so useful and can be used with other sets from Visible Image.
I created the background by putting white card onto shaving foam with ink on top, it doesn't matter how many times I do this I'm always amazed with what I get.
So onto this background I stamped the bubbles using an Indigoblu stamp which I embossed in purple. Added the Glitterations letters to spell out Hannah and added a Happy Birthday peel off to one of the bubbles.
I used a spotty mask to add a few spotchy dots to the top right-hand corner in dark purple ink. Finally I stamped Molly onto white card, coloured her using Promarkers, cut her out and stuck her to the bottom right-hand corner.
I know I seem to be an internet billboard for Visible Image but they are amazing, the images are brilliant and the stamps are really well made.
To see them for yourself here's the link Visible Image
I created the background by putting white card onto shaving foam with ink on top, it doesn't matter how many times I do this I'm always amazed with what I get.
So onto this background I stamped the bubbles using an Indigoblu stamp which I embossed in purple. Added the Glitterations letters to spell out Hannah and added a Happy Birthday peel off to one of the bubbles.
I know I seem to be an internet billboard for Visible Image but they are amazing, the images are brilliant and the stamps are really well made.
To see them for yourself here's the link Visible Image
Thursday, 26 March 2015
We're All Mad Here
I have waited ages to use this stamp set, the Mad Hatter from Alice in Wonderland has always been one of my favourite characters, even before Johnny Depp played him.
I used another favourite character as inspiration for the colour scheme, the Joker from the original Batman film, he gave me the green, purpl and orange of his clothes.
I coloured him in using my Promarkers, then cut him out ready to go on my card.
Next I took three pieces of 6x6 cards, one black, one green and one purple, cutting each piece slightly smaller than the last. Taking the black piece of card I started by stamping the Ha several times in Versamark and embossed them in orange using WOW powder, then I stamped the scribble circles using Versamark and ebossed those using orange WOW powder.
You'll notice that there a few little marks on the black card, I hadn't noticed there were a couple of pieces of powder on it and this is the result of brushing off embossing powder when it is not completely set (I had to be careful with the yellow circles so I didn't burn the orange words) I did manage to fix the problem with a little black Promarker. Phew!
Finally I stamped the words that also come with the Hatter onto separate pieces of white card and mounted these onto a piece of green and a piece of purple.
I used another favourite character as inspiration for the colour scheme, the Joker from the original Batman film, he gave me the green, purpl and orange of his clothes.
Next I took three pieces of 6x6 cards, one black, one green and one purple, cutting each piece slightly smaller than the last. Taking the black piece of card I started by stamping the Ha several times in Versamark and embossed them in orange using WOW powder, then I stamped the scribble circles using Versamark and ebossed those using orange WOW powder.
You'll notice that there a few little marks on the black card, I hadn't noticed there were a couple of pieces of powder on it and this is the result of brushing off embossing powder when it is not completely set (I had to be careful with the yellow circles so I didn't burn the orange words) I did manage to fix the problem with a little black Promarker. Phew!
Finally I stamped the words that also come with the Hatter onto separate pieces of white card and mounted these onto a piece of green and a piece of purple.
Tuesday, 24 March 2015
Orin
I have to confess I've had this Visible Image stamp for a while now but I haven't used it, so after a challenge from a friend at work to create something with my unused stamps I have made this.
I started by colouring Orin in using Promarkers, then cutting him out. I chose greens and browns as I don't usually work in these colours but thought they were more elf like.
Next I stamped the Mystical Map, also Visible Image, onto a white 6x6 card blank, I then put this to one side to allow the ink to dry. I used my time to stamp the celtic seal from the Orin set onto white card, embossed it in gold and cut around it.
I then went back to the stamped card blank and began inking it using Distress inks, in various shades of brown, I wanted to give the card an aged look rather than the crisp white of the original blank.
I started by colouring Orin in using Promarkers, then cutting him out. I chose greens and browns as I don't usually work in these colours but thought they were more elf like.
Next I stamped the Mystical Map, also Visible Image, onto a white 6x6 card blank, I then put this to one side to allow the ink to dry. I used my time to stamp the celtic seal from the Orin set onto white card, embossed it in gold and cut around it.
I then went back to the stamped card blank and began inking it using Distress inks, in various shades of brown, I wanted to give the card an aged look rather than the crisp white of the original blank.
Sunday, 22 March 2015
Dorothy
I know I've said this before but I love Visible Image stamps so here is another one for you.
This is Dorothy from the Wizard of Oz range, she's been coloured using Promarkers and cut out ready to go onto a 6x6 card.
Next I concentrated on the background, I've been playing about with my mica sprays to create different effects on my cards. This one was done using watercolour card, water, green and yellow mica sprays.
I was really happy with the 'yellow brick road' effect running throught the middle of my finished piece.
However this card was missing something, so I added the birds using the stamps included in this set, I used Memento to do this as I didn't want the stark black would have got from something like StazOn.
Finally I used another of the stamps from this set to create the embossed 'Dreams do come true' wording.
Saturday, 21 February 2015
For anyone who doesn't know I am a huge fan of Visible Image stamps and when they brought out the Wizard of Oz characters I just had to have them, especially the Flying Monkey set.
I coloured him using Promarkers and Spectrum Noir pencils.
I coloured the background with Cosmic Shimmer sprays and stamped several of the silhouette monkeys from the set in black.
I stamped the words, which are also in the set, onto card and mounted the whole lot onto a 6x6 card. Simple, quick and very cool.
I coloured the background with Cosmic Shimmer sprays and stamped several of the silhouette monkeys from the set in black.
I stamped the words, which are also in the set, onto card and mounted the whole lot onto a 6x6 card. Simple, quick and very cool.
Friday, 29 August 2014
Fae Hope
I've been desperate to play with my newest Visible Image stamps from the INKognito range but I have been so busy during the school holidays.
So here is a quick card that I made using the Butterfly and Fae from their fantasy range.
I started by stamping the butterfly in Versamark ink, I then used Cosmic Shimmer Mica powder to create the iridescent finish (sorry the photo doesn't do it justice).
Next I stamped and coloured the beautiful Fae using pencils.
I fussy cut her and stuck her to the front of my card.
Finally I added a greeting to a piece of yellow card I had cut using a Spellbinders die.
Thursday, 28 August 2014
Harley Any Colour
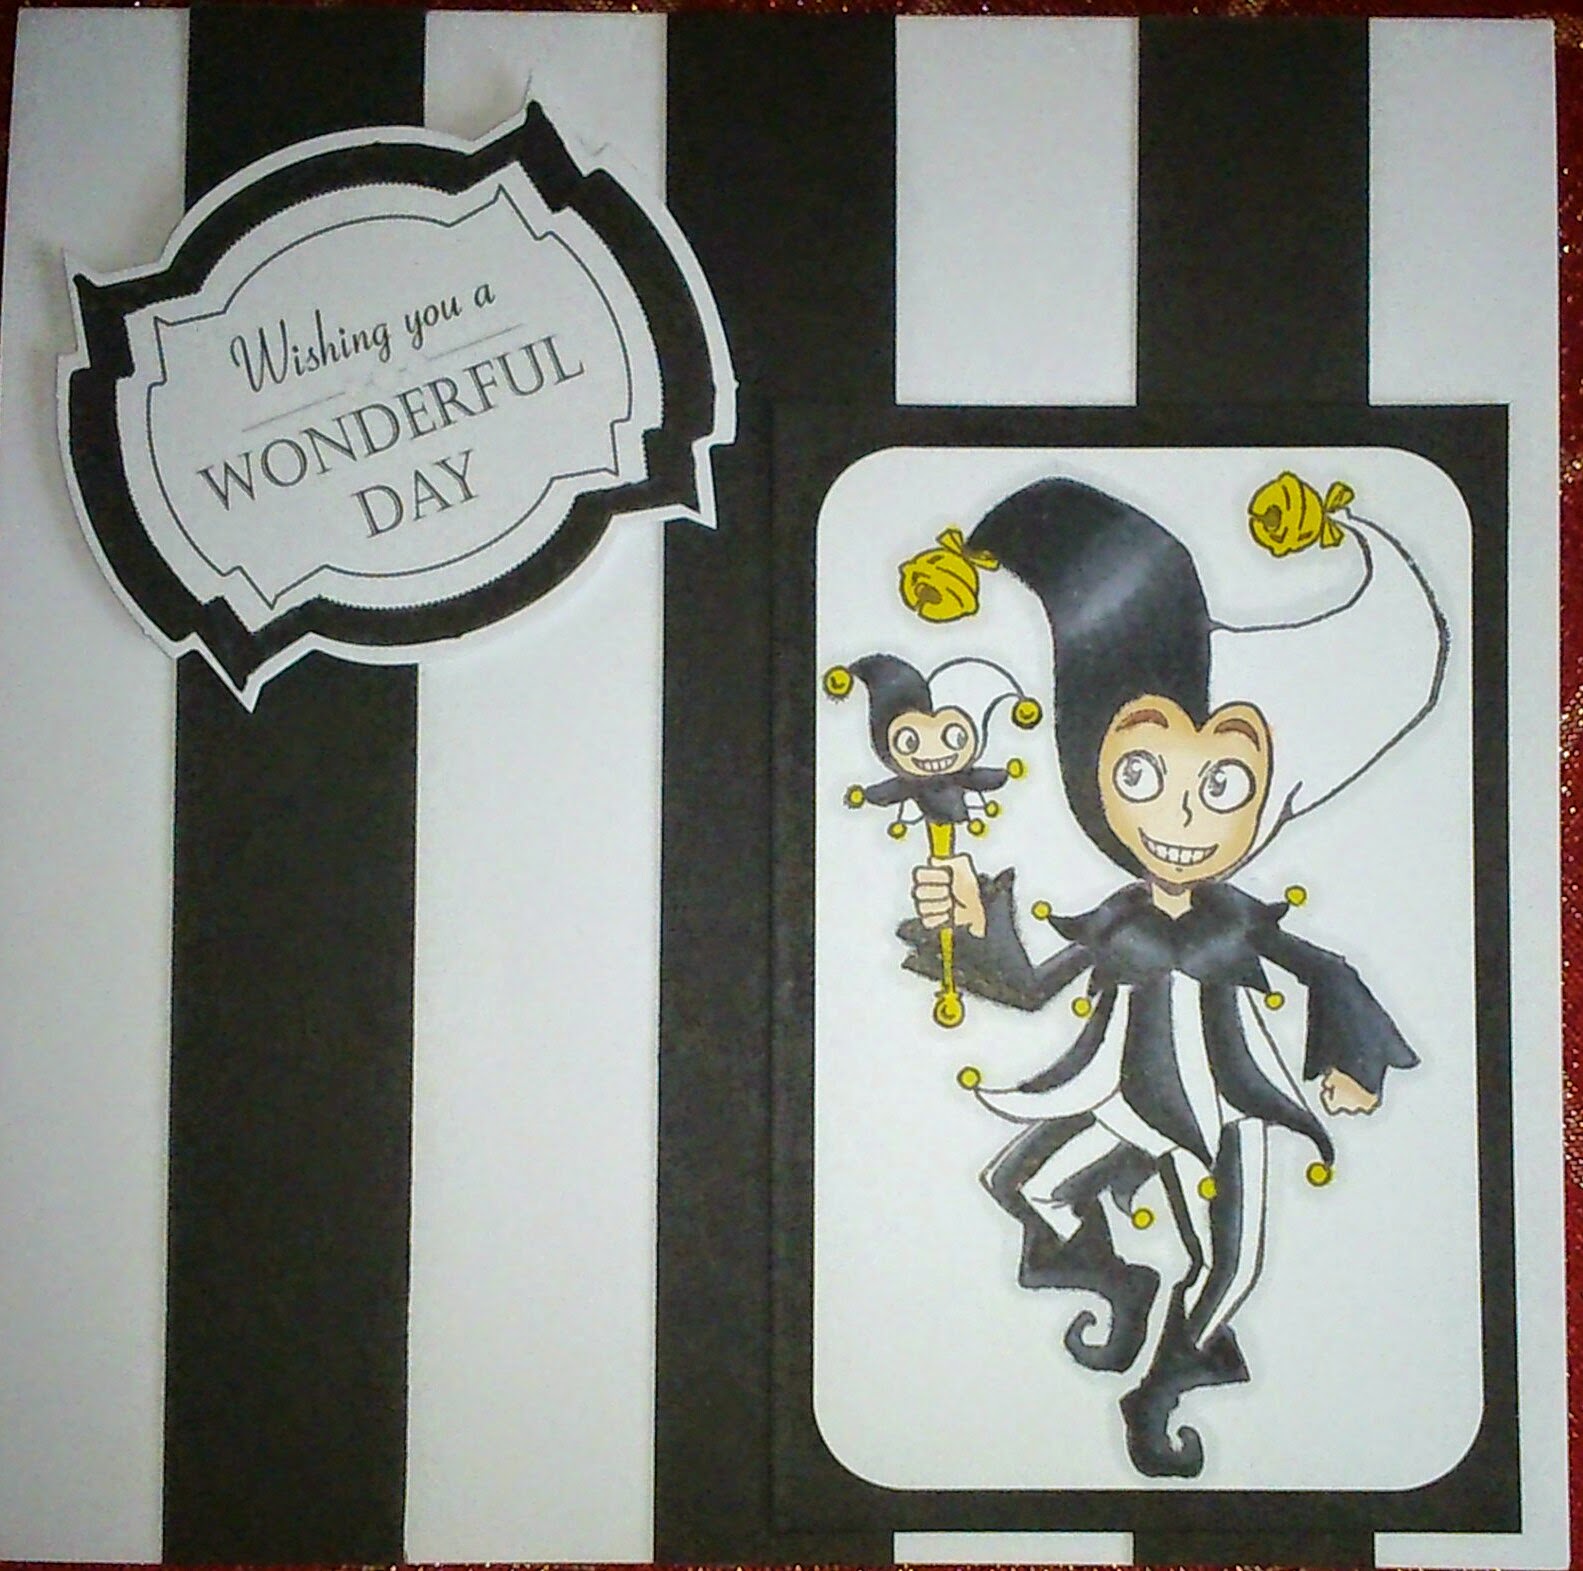
I absolutely love the Harley stamp set from Visible Image I've used him on a few cards but this is one of my favourites.
I stamped Harley onto a piece of white card and coloured him in using the following Spectrum Noir pens:
IG1, IG6, IG7, IG8, IG9, IG10
FS1, FS2, FS3, CT4, TN7, Black
I then rounded the corners of the image and mounted it onto black card. Finally I stuck the image to front of the card and added a slightly altered Anna Marie Designs greeting (it was black with white spots but I didn't like the spots so coloured it in)
I am entering this into the August challenge at Visible Image.
Subscribe to:
Posts (Atom)